So I got the idea in my head that I should make my own headpins. I'd been ordering them from a wonderful lady on Etsy, but my latest order was delayed (holidays! *shakes fist*), which made me investigate the process.
By Googling phrases like "how to make headpins," I found tons of videos and tutorials. Some - like
this one - made the whole process seem like a walk in the park. Some - like
this three- part video series - intimidated me (my eyes glazed over around the time she whips out the pickle pot.)
Still, I wanted to at least give it a try.
As it turns out, gathering all the materials was the hardest part.
I hoped to avoid the big-box stores by shopping at my local hardware store for materials, but that proved fruitless. So off to Lowe's I went, in search of the butane torch, fuel, denatured alcohol and boric acid.
Slight digression: I hate Lowe's with a passion. For anyone not schooled in the ins and outs of plumbing, power tools, and other Guy Stuff, it's a perfect illustration of the Needle in the Haystack principle. I wandered and wandered looking for boric acid. The customer service people told me in the Pool department, and waved vaguely toward the back of the store. After looking for it for about 15 minutes, I gave up and went back to customer service. Finally, they told me where it was (outside, as it turns out). And after all that, there was no boric acid in the Pool department (trust me, I scoured the shelves). I ended up finding boric acid at – wait for it- Rite Aid. Sigh.
(Disclaimer: I've never taken a metalsmithing class, and the process described below probably reeks of ignorance and hubris. Follow my lead at your own risk.)
I used 24 and 26 gauge argentium sterling silver, since that's what I had on hand. I clipped the wire into 2" sections, then dipped the wire pieces in a 50/50 solution of denatured alcohol and boric acid in hopes of minimizing firescale, but honestly? I don't think it helped at all. It did help me feel all sophisticated and scientific, however.
Firing up the butane torch was thrilling, to say the least. Forming uniform, non-lopsided balls with sterling silver definitely takes technique. It's not difficult, per se, just tricky.
Here's my setup:
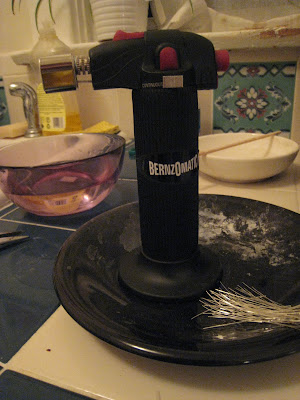
Since I'm left-handed, the water bowl sits on the left to the torch. You can see the tip of the cruddy old pliers I used to hold the headpins, as well as a batch of cut wire ready to be zapped.
And yes, that's my kitchen counter. It's the most fireproof section of my apartment, ok?
Afterward I rubbed the blackness off the headpins using the dark green side of a regular old kitchen sponge. Next time I'm at the hardware store I'm going to buy some extra-fine steel wool, but the sponge worked fine.
I skipped the whole process of pickling, tumbling, and all the rest. Does that make me a terrible person? Maybe, but I'd rather just polish the headpins by hand and call it a day.
Here's a shot of my very first batch of completed headpins:

(bonus glimpse of my messy work area in the background!)
They rock, if I do say so myself. Flush with victory, I made this bracelet with them:
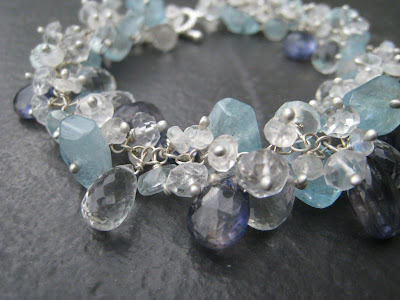
Argentium sterling silver is perfect for this type of bracelet, since the metal is stronger than regular sterling, and it never tarnishes.
Truthfully, my homemade headpins look better than sterling headpins I've purchased. The balls are nice and smooth, whereas the balls on the sterling headpins I'd purchased were a bit shriveled looking.
Since my first batch, I've ordered tons more argentium silver wire. I plan on selling some of the resulting headpins on Etsy, since no one else seems to offer them. Yay, headpins!
Stay tuned for Part II: Fine Silver Came Directly from the Gods.
Sources/further reading:Sterling Silver Headpin Tutorial from Silver River JewelryTutorial from Michon Jewelry

 Oooh...


