Wednesday, December 31, 2008

Experimenting with light

My lighting setup has now been enhanced with two small battery-powered lamps (thanks, Mom!). They emit a bluish light.

For comparison's sake, here are my Primrose Earrings photographed using the old setup (one halogen desk lamp and a lamp with a plain old incandescent bulb):


And here are the same earrings photographed with the two new lamps arranged on each side of the photo box:

So, which do you like better? The biggest quibble I have with the new lamps is that they seem to wash out the delicate golden colors of the earrings a bit. In real life, the earrings have lots of rich golden tones, which is what I need to convey in the photo.

This picture uses the new lamps, and it's a bit more true to life:


However, you can still see all the blue cast onto the photo.

Of course, the real magic happens when I let my trusty blue paper to make the earrings pop:

In this photo, the lamps add more light to the photo without distorting the colors too much.

So, which setup do I use? Do I aim for ultimate truth in advertising, or add some pizzazz to my photos with interesting blue reflections?

I still need to test the lamps on blue-toned pieces. It's likely they will really enhance the colors. Also, I have some bright orange paper to test out!

Etsy getting stats, finally!

From Auctiobytes via Etsy Bitch:
Etsy said it was conducting a beta test with Google Analytics to enable sellers to track metrics such as pageviews, site visits, popular content and page referrals.
It's about time.

Working at a web dev shop, even the worst pre-makeover websites we get through the door have analytics installed - usually Google Analytics because it is a cheap, free option. It's surprising that Etsy never pursued analytics before this. Plus it's a little odd that they're spearheading the effort in this way, rather than simply flipping a switch that would let sellers install Google Analytics on their pages on their own time.

Stats are going to change the Etsy selling game. I love combing through site stats to learn what sort of keywords, referring sites, and niche search engines are driving traffic. It's simply impossible to predict what's really driving traffic and sales without seeing analytics data.

I'm especially interested to see how many sales are driven through Etsy's search. The site's search is notoriously broken, and analytics are likely to throw this issue into sharp relief.

Tuesday, December 16, 2008

I'm not a dork, I'm a devotee

It occurred to me just now that when we throw around terms like "nerd" or "dork," we're simply referring to someone who is devoted to a particular hobby, idea, etc.

So, put another way, dorks are devotees.

In related news, I've been making a lot of headpins recently.


This is for a few reasons. First, selling headpins seems like a practical way to rack up some sales. Also, I need headpins - lots of them - for my own creations.

But most of all, it's just fun to fire up the torch and play around. When learning something new like this, I like to get a little obsessive. It helps me refine my techniques and gain some muscle memory.

Here's what I've learned so far making headpins:

1. Don't overcook them. Especially with fine silver, it's easy to get lazy and let the balls get too big and gloppy; I ruined a bunch of headpins this way. Now I chant "medium rare....MEDIUM RARE!" to myself as I make them.

2. Making uniform, non-lobsided balls with sterling silver is difficult at first, but after a lot of practice it's second nature. Hang in there, or just buy headpins from me!

3. And an actual, perhaps useful tip...

At first my biggest challenge when making headpins was making them a uniform length. Anything less than 1" is unusable, and anything more than 1.75"-2" is a waste of wire. But measuring and cutting wire is a big pain. So, try this:

From your spool of wire, cut several sections of 4-5 feet each. No need to measure; just estimate the length by counting each time around the spool as the wire comes off.

Let gravity help you straighten the wire. Line up the ends so you have three (or more, depending on the strength and size of your wire cutters) long strands of wire bundled together in your hand.

Starting at the edge you've lined up, measure and cut away. I do all my beading on a mat with measurements on it, so I just lay down the wire on that and cut the wire to sections a hair over 2". I find this lets me create headpins of 1.5-1.75 inches. As you reach the ends of the wires, pay attention so you minimize waste. (theoretically, the longer your sections to start with, the less waste you'll end up with.)

Does that make sense? All you're doing is dividing your time by a factor of three or four, and maximizing that satisfying SNAP! sound you get when cutting wire.

I've found I can chop up a full troy ounce (~75 feet) of wire in a few minutes using this method; best of all, the pieces are totally uniform.

Warning: be careful as you cut the wire, or else the pieces will fly all over the place.

Tuesday, December 9, 2008

90% of everything is crap. 90% of crafting is marketing.

The top sellers on Etsy have one thing in common: superior marketing. It’s not about your product, it’s about how you market yourself and your product – and that goes doubly when it comes to handmade, because with handmade products you’re buying one or more of the following value propositions:
  • Superior workmanship
  • Personalized service
  • Uniqueness
  • Attention to detail
  • Environmental friendliness
  • Buying directly from an artisan
  • Etc.

In other words, it’s not just about buying a necklace for your girlfriend: it’s about buying a one-of-a-kind hat from Theresa in Vermont (or wherever) who dyes her own wool and has a really charming blog and a killer email newsletter. It’s about marketing – all that stuff that transforms a necklace into a necklace I need to have.

When something is more expensive by dint of being one-of-a-kind and handmade, marketing becomes essential. Handmade items are unique by definition, so being unique isn’t enough.
Plus, Etsy is a marketplace that is flooded with products and sellers. Most of those products are crap, and all sellers are competing for the same small group of buyers.

And to top it all off, Etsy’s site search is rather useless, so search optimization techniques aren’t enough to get eyeballs on your product.

If I ever found myself teaching a marketing course, I would have my students open a shop on Etsy and give them a budget (say, $300) to cover craft materials, marketing expenses, and Etsy fees. The students who sold the most stuff would get a good grade.

At first blush, this plan seems terribly unfair to students who aren’t artistically inclined, but honestly? A good marketer can sell the ugliest, stupidest product with clever marketing techniques, and I think this plan would illustrate that principle quite well.

The truly savvy (and cynical) students would spend minimal time and money on materials for whatever they’re selling in their shop. The smarter ones would focus on marketing, as well as carving out their own special niche on Etsy (for example, jewelry is the most saturated category on Etsy, which suggests that I am terrible at taking my own advice). They would be able to use whatever online or offline marketing channels they wished (including affiliate programs, word of mouth, banner ads, paid search, social media…the list goes on).

The wrinkle in all of this is that Etsy gives sellers zero stats, so you (or my fictional students) have no idea of telling where your sales are coming from. Short of clairvoyance, it’s impossible to know whether that banner ad or email blast drove sales, or whether it’s a total waste of money. (Customer surveys are a possibility, but seem hopelessly quaint in this era of sophisticated and free Web analytics systems.)

Anyway.

Since I do marketing during the day and Etsy-type activities at night, the intersection between the two is pretty interesting to me. Oh yes…something as banal as marketing has such an effect on the pure and noble activity of crafting. The horror.

(Sorry for the lack of pretty pictures in this post. I will have more, and more specific, things to say on this subject soon.)

Monday, December 1, 2008

Adventures in jewelry photography, part 1: the ghetto-fabulous DIY photo box

First, I photographed jewelry items on my fire escape.

Then, I went to Horton Plaza during lunch breaks at work, and photographed jewelry on the edge of a planter.

I liked the texture of the planter, as well as its slight sheen. But shooting in the noonday sun isn't exactly a controlled environment. The photos had insane shadows – such that bracelets looked the size of Godzilla and earrings the size of yachts. The shots had a certain drama, but didn't really show off the detail of the item (and I hear people like to see what they're buying. Call me crazy, but...).

Seeing my pictures on Flickr, I guess my mom took pity on me and sent me this tutorial for a $10 macro photo studio. I totally ignored her suggestion at first, but spurred by something or other (the vastly superior shots of other jewelry designers, maybe), I set about building the studio. Far be it for me to ever refuse an opportunity to use an X-Acto knife.

Cost: $0. I used an egg box nabbed from the back of a dessert store many months back, as well as tissue paper and painter's tape. X-Acto blades, naturally – I have plenty of those - and a straightedge. Here's a progress shot:


I was up and running in less than an hour.

Then comes the fun part. My initial shots were pretty horrible:


These look like I shot them in the DMV, don't they?

However, now that I've gotten better, I can proclaim that taking crummy test shots is an important part of the process. Your eye gets trained, and you learn the finer points of your camera's macro lens. You learn to rig up whatever lights you may have – in my case a halogen desk lamp from the closet to supplement the table lamp on my craft table (I nearly typed "dining table" – but no, it's buried under a thick layer of craft supplies).

Soon, I was grabbing items left and right to give them their turn in the photo box. A vintage ceramic pigeon. A white pot from IKEA. A vase, again from IKEA. Any number of items from my motley collection of vintage dishes, art glass and the like.

I recalled jewelry stores displaying jewelry on rice, so I grabbed that too:


It adds a nice texture but I, for one, despise the yellow tint it gave to the photos (that could be corrected with better lighting and Photoshop, but I'm still not a fan).

I hit on the idea of hanging earrings on a little black lotus-shaped dish. The earrings hang attractively from the dish, and the contrast between white background and black dish is quite delicious:


I was ecstatic when I got this shot. It's so much more true to life than any earlier shots I'd taken of these earrings. Plus, they're almost in focus!

My other nemesis turned out to these Champagne and Berries earrings. They are glossy little treasures in real life, but I was having trouble capturing their essence in photos.

Enter the blue paper.

First, with plain white paper:


And now with blue:

Doesn't that blow your mind? It blows mine. Same earrings, same lighting, same dish, same position. That's some photographic voodoo right there.

Having gotten the basic hang of things, I'm now experimenting more with a dish that I picked out at World Market for its photogenic qualities. You'll also notice that I'm tending to favor black paper for the background, but that's probably momentary. I need to stock up on orange/red/pink paper for shots of cool-toned jewelry.


At this point I was really focusing on, well, focus. Properly focusing my shots is something I have trouble with, partly because I employ a spastic point-and-shoot technique when taking photos. I'm also working on styling the shots more carefully (no smudged focal stones!).

After studying some nice product shots, I also came to appreciate shooting jewelry from directly above:

The advantage of this method is that the piece can be styled so it's more flat - making focusing the shot much easier. The disadvantage is that you can block your light sources if you're not careful.

I love the little freckles on the bowl. Nevermind the haphazard styling of this shot.

And by gum, I think I've learned to get the camera to focus on at least one of the subjects of the photo! (Also, I love the "rising out of the mist" quality of this photo.)

So, I'm still experimenting with this beast. But I'm pleasantly surprised by all the fun you can have with a homemade photo box, a digicam's macro lens and a few spare evenings. And no more trips to Horton Plaza to photograph jewelry among the lunch crowd!

Featured in my first Treasury


This morning, I was so excited to receive a message from mamasmeltdown, who included my Glacial bracelet in an Etsy treasury! See me up there, in the top right?

Fittingly, the theme of the treasury is "hidden treasures discovered."

Yay! It's awesome to be picked out of the huge haystack that is Etsy!

Saturday, November 29, 2008

How (not) to make headpins. Part 2: fine silver

Oh my God, making headpins using fine silver is so much easier than argentium. Seriously. I wouldn't even bother with the argentium, but its strength comes in handy for a lot of projects.

Here's the summary of my process for fine silver:

1. Cut wire (I ordered mine from fusionbeads.com) into sections of 1.5 inches - 2.5 inches. You lose up to half an inch when balling the wire, so be careful not to cut it too short.

2. Wave the wire in the general direction of a lit butane torch.

3. Enjoy perfectly formed headpins!

Ok, it's not quite that easy, but...well, it pretty much is. You still need to hold the wire straight up, otherwise the ball will be lopsided. And I noticed that if you heat up the wire too much, not only does the ball get too big, but it turns matte. It's not ugly, but I was going for smaller, shiny balled ends.

The hardest part for me was stopping. I burned through a 75-foot coil of wire like it was no thang, then collapsed all twitchy because I have no more wire left. But hey, I have a great batch of heapins for sale and personal use now!

I also had lots of fun taking artistic pictures of the headpins for Etsy. They're tied with neato hemp string I found at a local stationery store.

Oooh...


Aaahhh....!

By the way, these photos were taken in my ghetto-fabulous photo box, which I will be writing about shortly.

So yeah. I'm not saying my headpins are the best ever, but they pretty much are. Buy them here: [26 gauge, 2 inches long] [1.5-1.75 inches long]

Related: How (not) to make headpins, Part 1

How (not) to make headpins. Part 1: argentium sterling silver

So I got the idea in my head that I should make my own headpins. I'd been ordering them from a wonderful lady on Etsy, but my latest order was delayed (holidays! *shakes fist*), which made me investigate the process.

By Googling phrases like "how to make headpins," I found tons of videos and tutorials. Some - like this one - made the whole process seem like a walk in the park. Some - like this three- part video series - intimidated me (my eyes glazed over around the time she whips out the pickle pot.)

Still, I wanted to at least give it a try.

As it turns out, gathering all the materials was the hardest part.

I hoped to avoid the big-box stores by shopping at my local hardware store for materials, but that proved fruitless. So off to Lowe's I went, in search of the butane torch, fuel, denatured alcohol and boric acid.

Slight digression: I hate Lowe's with a passion. For anyone not schooled in the ins and outs of plumbing, power tools, and other Guy Stuff, it's a perfect illustration of the Needle in the Haystack principle. I wandered and wandered looking for boric acid. The customer service people told me in the Pool department, and waved vaguely toward the back of the store. After looking for it for about 15 minutes, I gave up and went back to customer service. Finally, they told me where it was (outside, as it turns out). And after all that, there was no boric acid in the Pool department (trust me, I scoured the shelves). I ended up finding boric acid at – wait for it- Rite Aid. Sigh.

(Disclaimer: I've never taken a metalsmithing class, and the process described below probably reeks of ignorance and hubris. Follow my lead at your own risk.)

I used 24 and 26 gauge argentium sterling silver, since that's what I had on hand. I clipped the wire into 2" sections, then dipped the wire pieces in a 50/50 solution of denatured alcohol and boric acid in hopes of minimizing firescale, but honestly? I don't think it helped at all. It did help me feel all sophisticated and scientific, however.

Firing up the butane torch was thrilling, to say the least. Forming uniform, non-lopsided balls with sterling silver definitely takes technique. It's not difficult, per se, just tricky.

Here's my setup:

Since I'm left-handed, the water bowl sits on the left to the torch. You can see the tip of the cruddy old pliers I used to hold the headpins, as well as a batch of cut wire ready to be zapped.

And yes, that's my kitchen counter. It's the most fireproof section of my apartment, ok?

Afterward I rubbed the blackness off the headpins using the dark green side of a regular old kitchen sponge. Next time I'm at the hardware store I'm going to buy some extra-fine steel wool, but the sponge worked fine.

I skipped the whole process of pickling, tumbling, and all the rest. Does that make me a terrible person? Maybe, but I'd rather just polish the headpins by hand and call it a day.

Here's a shot of my very first batch of completed headpins:

(bonus glimpse of my messy work area in the background!)

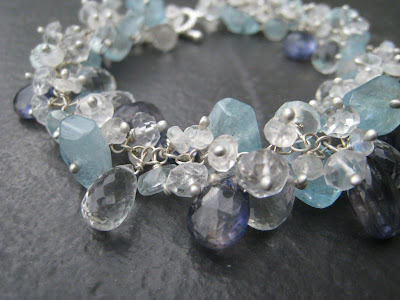
They rock, if I do say so myself. Flush with victory, I made this bracelet with them:


Argentium sterling silver is perfect for this type of bracelet, since the metal is stronger than regular sterling, and it never tarnishes.

Truthfully, my homemade headpins look better than sterling headpins I've purchased. The balls are nice and smooth, whereas the balls on the sterling headpins I'd purchased were a bit shriveled looking.

Since my first batch, I've ordered tons more argentium silver wire. I plan on selling some of the resulting headpins on Etsy, since no one else seems to offer them. Yay, headpins!

Stay tuned for Part II: Fine Silver Came Directly from the Gods.

Sources/further reading:
Sterling Silver Headpin Tutorial from Silver River Jewelry
Tutorial from Michon Jewelry